A walk-in cooler is one of the most important storage areas in a restaurant, market, deli, bakery, seafood business, convenience store, or foodservice operation. But choosing the right size is only one part of the decision. The way a walk-in cooler is laid out can affect daily workflow, food safety, inventory control, product rotation, employee efficiency, and long-term usability.
Many business owners start by asking, “What size walk-in cooler do I need?” That is an important question, but it should not be the only one. A better question is: “How should my walk-in cooler be designed around the way my business actually operates?”
A well-planned walk-in cooler layout helps staff move faster, store products more safely, reduce waste, and keep high-use items easy to access. A poorly planned layout can lead to blocked aisles, crowded shelves, temperature problems, cross-contamination risks, and wasted space.
This guide covers practical walk-in cooler layout design ideas, shelving examples, door placement tips, workflow planning, cooler/freezer combo layouts, and common mistakes to avoid before you buy.
Why Walk-In Cooler Layout Matters
Walk-in cooler layout affects more than storage capacity. It affects how your team receives, stores, prepares, and uses inventory every day.
A good layout can help your business:
-
Keep perishable products organized
-
Improve first-in, first-out inventory rotation
-
Reduce unnecessary door openings
-
Support safer food storage practices
-
Make high-volume ingredients easier to access
-
Prevent overcrowding and blocked airflow
-
Improve staff movement during busy service hours
-
Make deliveries easier to manage
-
Reduce product waste and forgotten inventory
For example, two businesses may both purchase a 6' x 8' walk-in cooler, but the actual usability can be very different depending on door placement, shelving depth, aisle space, product categories, and how often staff need to enter the cooler.
The best walk-in cooler layout is not always the largest layout. It is the layout that matches your operation.
Start With Your Daily Workflow
Before choosing a walk-in cooler layout, think about how food moves through your business.
In most foodservice operations, inventory follows a path like this:
Receiving area → walk-in cooler → prep area → cook line or service area
Your layout should support that movement. If deliveries come through a back entrance, the walk-in cooler should be easy to access from that receiving point. If kitchen staff use fresh produce, dairy, sauces, or proteins throughout the day, those high-use items should be easy to reach from the prep area.
Ask these questions before finalizing your walk-in cooler design:
-
Where do deliveries enter the building?
-
Who receives and checks inventory?
-
Where is food prepared?
-
Which products are used most often?
-
Which products are stored in bulk?
-
How often will employees enter the cooler?
-
Will employees carry large boxes, cases, or carts?
-
Is there enough clearance for the door swing?
-
Will the cooler block any kitchen traffic?
-
Do you need cooler storage, freezer storage, or both?
A walk-in cooler should not feel like an isolated box placed wherever there is extra space. It should be part of the kitchen’s operating flow.
Walk-In Cooler Door Placement Ideas
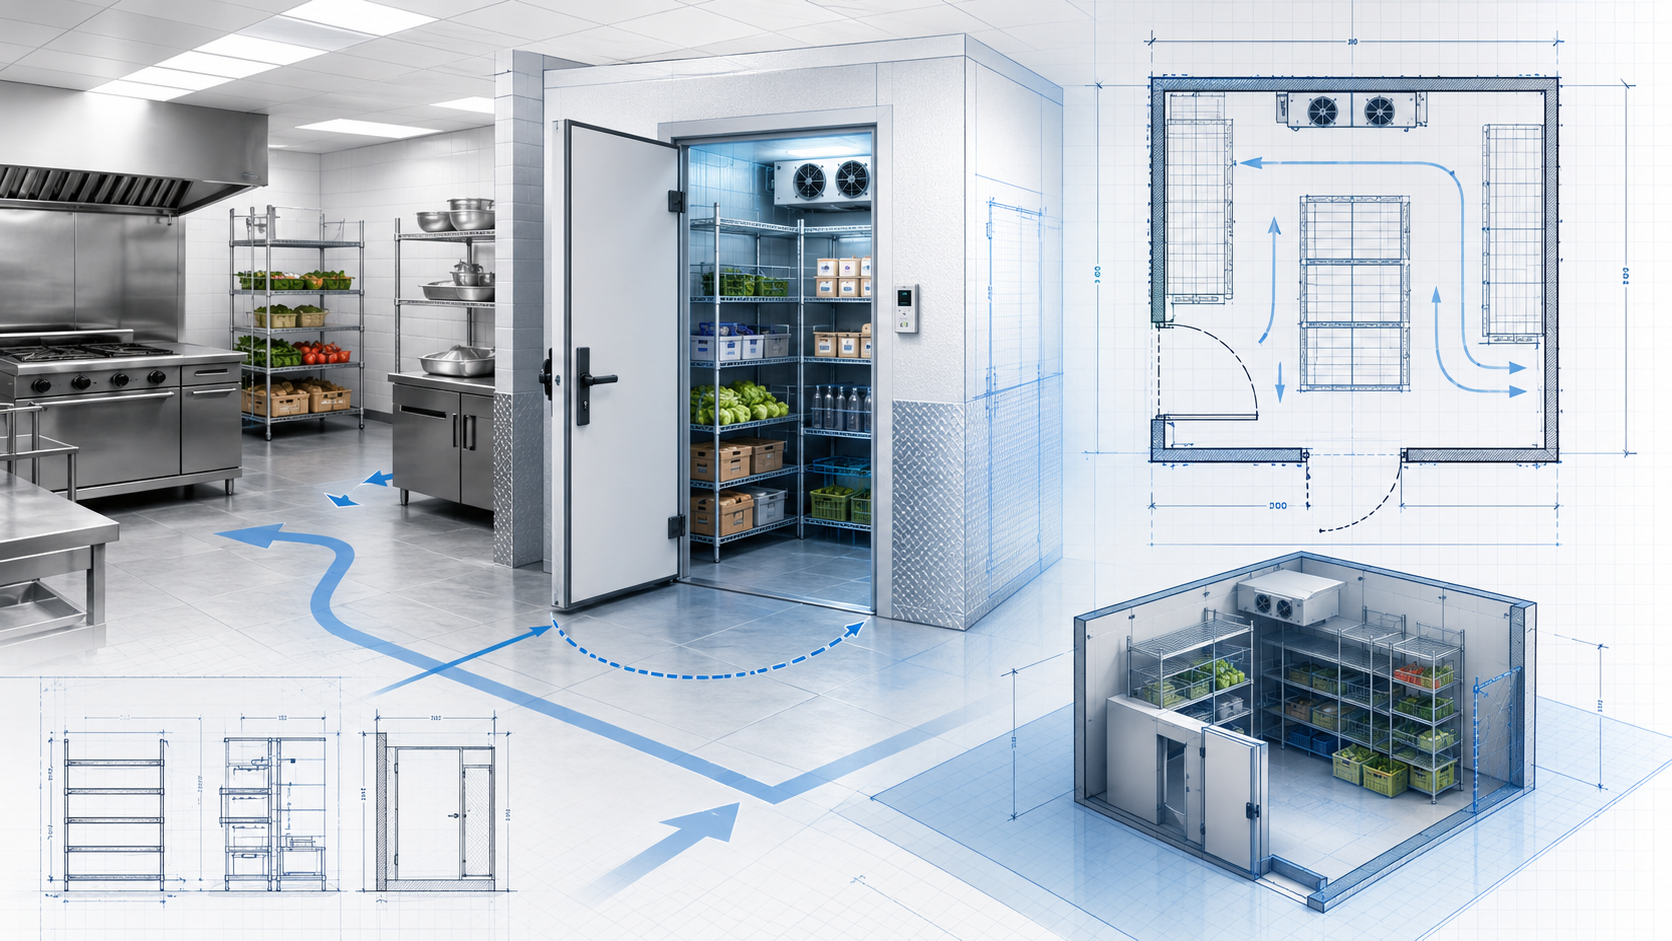
Door placement is one of the most important parts of walk-in cooler layout design. The door determines how employees enter the cooler, how products are moved in and out, and whether the cooler works smoothly with the rest of the kitchen.
Door Near the Prep Area
For restaurants, cafés, bakeries, and delis, placing the walk-in cooler door close to the prep area can make daily work easier. Staff can quickly access produce, dairy, sauces, meats, prepared ingredients, and backup items without walking across the kitchen.
This layout works well when the cooler is used frequently throughout service.
Best for:
-
Restaurants
-
Pizzerias
-
Delis
-
Cafés
-
Bakeries
-
Sandwich shops
-
High-volume prep kitchens
Door Near the Receiving Area
If your business receives large deliveries, placing the walk-in cooler near the receiving area can reduce labor and make stocking easier. Employees can move cases directly from the delivery point into cold storage without crossing the entire kitchen.
This is especially useful for markets, supermarkets, seafood businesses, convenience stores, and operations that receive frequent bulk deliveries.
Best for:
-
Grocery stores
-
Markets
-
Seafood businesses
-
Convenience stores
-
High-volume restaurants
-
Foodservice operations with bulk inventory
Door Between Receiving and Prep
The ideal layout for many businesses is a walk-in cooler positioned between receiving and prep. Deliveries can be stocked efficiently, and kitchen staff can access ingredients quickly.
This creates a practical flow:
Delivery → storage → preparation → service
Best for:
-
Full-service restaurants
-
Commissary kitchens
-
Catering businesses
-
Markets with prepared food programs
-
Multi-department food operations
Avoid Door Placement in Busy Aisles
A walk-in cooler door should not open into a congested aisle, dishwashing area, cook line, or narrow traffic path. If the door swing blocks employees, carts, prep tables, or equipment, the cooler can slow down the entire kitchen.
Before choosing the door location, measure the available clearance and think about how the door will open during peak hours.
Door Swing Direction
Door swing direction is often overlooked, but it can make a major difference in daily use.
A door that opens the wrong way can block prep tables, hit walls, interfere with equipment, or force staff to move awkwardly while carrying products.
When planning door swing, consider:
-
Which direction employees approach the cooler from
-
Whether the door will block a walkway
-
Whether the door will hit nearby equipment
-
Whether employees will carry boxes or trays
-
Whether the door should open toward the prep area or away from it
-
Whether the handle side is convenient for staff movement
If you are ordering a new walk-in cooler, confirm the door hinge side and swing direction before the unit is produced or shipped.
Walk-In Cooler Shelving Layout Ideas
Shelving is where walk-in cooler layout becomes practical. The right shelving plan helps you use the interior space efficiently while keeping products visible, accessible, and safe.
1. Straight-Line Shelving Layout
A straight-line shelving layout places shelves along one wall.
This layout is simple and easy to manage. It works well in smaller walk-in coolers or narrow spaces where you want to keep one side open for movement.
Best for:
-
5' x 6' walk-in coolers
-
6' x 6' walk-in coolers
-
Small restaurants
-
Cafés
-
Bakeries
-
Low-volume storage
Pros:
-
Simple to organize
-
Easy to walk in and out
-
Good for compact spaces
-
Leaves one side open
Cons:
-
Less storage capacity than multi-wall shelving
-
May not be enough for high-volume businesses
2. L-Shaped Shelving Layout
An L-shaped shelving layout uses two connected walls. This is one of the most common and practical layouts for restaurants and delis.
It gives more storage capacity than straight-line shelving while still leaving a clear aisle for staff movement.
Best for:
-
6' x 8' walk-in coolers
-
6' x 10' walk-in coolers
-
Restaurants
-
Delis
-
Pizzerias
-
Bakeries
Pros:
-
Good balance of storage and access
-
Easy to organize by category
-
Works well in small to medium walk-ins
-
Keeps a clear traffic path
Cons:
-
Corner areas must be organized carefully
-
Overcrowding can reduce visibility
3. U-Shaped Shelving Layout
A U-shaped shelving layout uses three walls. This design maximizes storage capacity and works well in larger walk-in coolers where the aisle is wide enough for employees to move comfortably.
Best for:
-
8' x 10' walk-in coolers
-
8' x 12' walk-in coolers
-
Markets
-
High-volume restaurants
-
Catering operations
-
Supermarkets
-
Foodservice businesses with bulk inventory
Pros:
-
High storage capacity
-
Good for category separation
-
Useful for bulk inventory
-
Can support multiple product zones
Cons:
-
Requires enough aisle space
-
Poor organization can make products harder to find
-
Can become crowded if overstocked
4. Center Aisle Layout
A center aisle layout uses shelving on both sides, leaving a walking path down the middle. This is common in larger walk-in coolers and market-style storage areas.
Best for:
-
Larger walk-in coolers
-
Supermarkets
-
Grocery stores
-
Commissary kitchens
-
High-volume foodservice operations
Pros:
-
Strong storage capacity
-
Easy to separate product categories
-
Good visibility when organized properly
-
Works well with frequent deliveries
Cons:
-
Requires more interior width
-
Aisle must remain clear
-
Not ideal for very small walk-ins
5. Zone-Based Shelving Layout
A zone-based layout organizes the cooler by product type or department.
Example zones:
-
Produce
-
Dairy
-
Meat
-
Seafood
-
Prepared foods
-
Beverages
-
Sauces and condiments
-
Backup inventory
-
Grab-and-go items
This layout is very useful for businesses that store many product categories in one walk-in cooler.
Best for:
-
Restaurants with large menus
-
Delis
-
Markets
-
Supermarkets
-
Seafood businesses
-
Prepared food operations
Pros:
-
Makes inventory easier to find
-
Supports safer storage practices
-
Helps with ordering and rotation
-
Reduces wasted time
Cons:
-
Requires staff discipline
-
Labels and shelf organization are important
-
Zones may need to change as menus change
Food Safety and Storage Zones
A walk-in cooler layout should support food safety. Products should be arranged to reduce cross-contamination risk and make temperature management easier.
A common commercial storage approach is to keep ready-to-eat foods and prepared items above raw products. Raw meats, poultry, and seafood should be stored in designated areas where leaks or drips cannot contaminate other foods.
A practical walk-in cooler storage order may look like this:
Top shelves:
-
Ready-to-eat foods
-
Prepared salads
-
Cooked items
-
Covered containers
-
Packaged grab-and-go products
Middle shelves:
-
Dairy
-
Produce
-
Sauces
-
Prep ingredients
-
Sealed containers
Lower shelves:
-
Raw seafood
-
Raw meat
-
Raw poultry
-
Heavy cases
-
Bulk products
This structure also helps staff find items faster and makes cleaning easier.
High-Turnover Items Should Be Easy to Reach
Not every product in your walk-in cooler is used at the same rate. Some items are accessed many times per day, while others are backup inventory.
High-turnover items should be placed near the entrance or along the most accessible shelves.
Examples of high-turnover items:
-
Lettuce and greens
-
Cheese
-
Sauces
-
Dough
-
Dairy
-
Seafood
-
Prepared proteins
-
Beverage backups
-
Daily prep containers
-
Common toppings
Backup inventory can be stored farther back or on less frequently used shelves. This reduces unnecessary walking and helps staff move faster during busy service.
Heavy Items Should Stay Low
Heavy cases, large containers, beverage boxes, and bulk ingredients should be stored on lower shelves. This improves safety and makes products easier to lift.
Avoid storing heavy items above shoulder height. This can increase the risk of spills, injury, and product damage.
Good lower-shelf items include:
-
Beverage cases
-
Large sauce containers
-
Bulk dairy
-
Meat boxes
-
Produce cases
-
Large prep containers
-
Heavy packaged ingredients
Upper shelves should be reserved for lighter, sealed, and easy-to-handle products.
Leave Space for Airflow
A walk-in cooler needs proper airflow to maintain consistent temperatures. Overcrowded shelving, blocked evaporator fans, and products stacked too tightly can reduce performance.
When planning the layout, avoid pushing boxes directly against walls or blocking airflow paths. Shelving should allow cold air to circulate around stored products.
A clean, organized cooler is easier to cool than a packed, disorganized one. Better airflow can also help reduce hot spots and temperature inconsistencies.
Small Restaurant Walk-In Cooler Layout Example
Small restaurants often need to maximize space without making the cooler difficult to use. A compact walk-in cooler should prioritize organization, visibility, and fast access.
Example layout for a small restaurant:
-
Shelving along one or two walls
-
High-use ingredients near the door
-
Prepared foods on upper shelves
-
Produce and dairy in the middle
-
Raw proteins on lower shelves
-
Heavy cases on bottom racks
-
Backup inventory toward the back
Best layout styles:
-
Straight-line shelving
-
L-shaped shelving
Common sizes:
-
5' x 6'
-
6' x 6'
-
6' x 8'
-
6' x 10'
For a small restaurant, the goal is not to fill every inch. The goal is to keep the cooler easy to enter, easy to clean, and easy to manage.
Pizzeria Walk-In Cooler Layout Example
Pizzerias often store dough, cheese, sauces, toppings, vegetables, and beverage backups. Because some ingredients are used constantly, accessibility matters.
Example pizzeria zones:
-
Dough trays
-
Cheese
-
Sauce containers
-
Toppings
-
Vegetables
-
Prep containers
-
Beverage backups
Recommended layout:
-
High-use cheese and sauce near the entrance
-
Dough trays on dedicated shelving
-
Toppings grouped by category
-
Vegetables stored separately from raw proteins
-
Beverages on lower shelves or in a separate section
Best layout styles:
-
L-shaped shelving
-
U-shaped shelving for larger pizzerias
Deli Walk-In Cooler Layout Example
Delis need clear separation between meats, cheeses, prepared salads, condiments, beverages, and grab-and-go items.
Example deli zones:
-
Deli meats
-
Cheeses
-
Prepared salads
-
Pickles and condiments
-
Sandwich prep items
-
Beverages
-
Backup inventory
Recommended layout:
-
Daily sandwich prep items near the door
-
Prepared foods on upper shelves
-
Meat and cheese organized by product type
-
Bulk containers on lower shelves
-
Labels for fast rotation
Best layout styles:
-
L-shaped shelving
-
Zone-based shelving
Bakery Walk-In Cooler Layout Example
Bakeries often use walk-in coolers for dairy, fillings, frostings, dough, fruit, prepared desserts, and chocolate or cream-based products.
Example bakery zones:
-
Dairy
-
Butter and cream
-
Fillings
-
Dough
-
Fruit toppings
-
Frostings
-
Prepared desserts
-
Specialty ingredients
Recommended layout:
-
Dairy and butter grouped together
-
Fillings and frostings in sealed containers
-
Dough trays on dedicated racks
-
Finished products stored separately from raw ingredients
-
High-use ingredients near the prep area
Best layout styles:
-
Straight-line shelving for compact bakeries
-
L-shaped shelving for larger bakeries
-
Rack-friendly layouts for dough trays and sheet pans
Seafood Business Walk-In Cooler Layout Example
Seafood businesses need careful storage planning because products are highly perishable and may require ice, drainage planning, and frequent access.
Example seafood zones:
-
Fresh fish
-
Shellfish
-
Seafood prep containers
-
Sauces and marinades
-
Ice storage area
-
Packaged seafood
-
Backup inventory
Recommended layout:
-
Seafood stored in dedicated lower zones
-
Products kept in leak-resistant containers
-
Clear separation from ready-to-eat items
-
Easy access to high-turnover seafood
-
Strong cleaning and drainage planning
Best layout styles:
-
L-shaped shelving
-
U-shaped shelving
-
Zone-based shelving
Market or Grocery Walk-In Cooler Layout Example
Markets and grocery stores often need larger storage layouts because they handle many product categories and frequent deliveries.
Example market zones:
-
Produce
-
Dairy
-
Beverages
-
Grab-and-go foods
-
Prepared foods
-
Packaged items
-
Bulk cases
-
Department backup inventory
Recommended layout:
-
Zone-based organization by department
-
Wider aisles where possible
-
Lower shelves for heavy cases
-
Clear labels by category
-
Bulk storage toward the back
-
Fast-moving retail items near the front
Best layout styles:
-
U-shaped shelving
-
Center aisle layout
-
Zone-based shelving
Cooler and Freezer Combo Layout Ideas
Some businesses need both refrigerated and frozen storage. A walk-in cooler/freezer combo can be a practical solution when floor space is limited or when both storage types need to be close to the kitchen.
Common combo planning considerations:
-
Cooler section size
-
Freezer section size
-
Separate door placement
-
Shared wall configuration
-
Staff access
-
Product categories
-
Delivery flow
-
Kitchen workflow
In many operations, the cooler side is accessed more frequently than the freezer side. If that is true for your business, place the cooler door closer to the prep area or main kitchen path. The freezer can be positioned for less frequent access.
Example combo splits:
-
Larger cooler with smaller freezer for restaurants
-
Balanced cooler/freezer split for markets
-
Larger freezer with smaller cooler for frozen food operations
-
Custom split based on product volume
A restaurant might need more cooler space for daily ingredients and a smaller freezer for backup inventory. A market may need a more balanced split. A bakery may need freezer space for dough and frozen products, plus cooler space for dairy and fillings.
Indoor Walk-In Cooler Layout Tips
Indoor walk-in coolers are common in restaurants, delis, bakeries, cafés, and commercial kitchens. They are usually placed in a kitchen, storage room, prep area, or back-of-house space.
Before installing an indoor walk-in cooler, consider:
-
Available floor space
-
Ceiling height
-
Door swing clearance
-
Prep area location
-
Receiving access
-
Floor condition
-
Electrical access
-
Drainage needs
-
Staff traffic
-
Nearby equipment
Indoor coolers should not block important kitchen paths or make it difficult for employees to move between prep, cooking, dishwashing, and storage areas.
Outdoor Walk-In Cooler Layout Tips
Outdoor walk-in coolers can help businesses save indoor space, but they require extra planning.
Before choosing an outdoor layout, consider:
-
Weather protection
-
Roof kit requirements
-
Door direction
-
Security
-
Access from the kitchen
-
Delivery route
-
Surface conditions
-
Drainage
-
Electrical and refrigeration setup
-
Distance from prep areas
If the outdoor cooler is too far from the kitchen, staff may spend too much time walking back and forth. If the door faces an exposed area, weather may make daily use more difficult.
Outdoor placement should balance available space, building access, weather exposure, and staff convenience.
Walk-In Cooler Layout Mistakes to Avoid
A walk-in cooler is a long-term investment. Avoiding layout mistakes before you buy can save time, money, and frustration.
Mistake 1: Choosing Size Before Planning Workflow
Do not choose a size based only on available square footage. First, think about how your team will use the cooler every day.
Mistake 2: Ignoring Door Placement
A poorly placed door can slow down staff and interfere with kitchen traffic.
Mistake 3: Blocking Airflow
Overloaded shelves and blocked fans can reduce cooling performance and create temperature issues.
Mistake 4: Not Planning for Deliveries
If large cases cannot be moved easily into the cooler, receiving becomes harder than it needs to be.
Mistake 5: Storing High-Use Items in the Back
Daily-use products should be easy to access. Backup inventory can go farther back.
Mistake 6: Mixing Product Categories Without a System
Without clear zones, staff may store products wherever there is space. This can create confusion and safety risks.
Mistake 7: Not Leaving Enough Aisle Space
A cooler packed with shelving but no room to move will be frustrating to use.
Mistake 8: Forgetting Future Growth
If your business is growing, plan for more storage than you need today. A cooler that is already full on day one may become a problem quickly.
Walk-In Cooler Layout Checklist Before You Buy
Use this checklist before choosing your walk-in cooler layout:
-
Measure the available space
-
Confirm ceiling height
-
Decide indoor or outdoor placement
-
Choose cooler, freezer, or combo
-
Plan door location
-
Confirm door swing direction
-
Check delivery access
-
Think about staff traffic
-
List product categories
-
Estimate daily storage volume
-
Identify high-turnover items
-
Plan shelving style
-
Leave aisle space
-
Keep airflow clear
-
Separate raw and ready-to-eat foods
-
Plan for heavy items on lower shelves
-
Allow space for future growth
-
Consider maintenance access
-
Review electrical and refrigeration needs
-
Speak with an equipment specialist before ordering
Example Layout Recommendations by Business Type
Small Restaurant
Best layout:
-
L-shaped shelving
-
Door near prep area
-
High-use ingredients near entrance
-
Raw proteins on lower shelves
-
Backup inventory toward the back
Pizzeria
Best layout:
-
L-shaped or U-shaped shelving
-
Dough and cheese zones
-
Sauce and toppings near the front
-
Beverage backups on lower shelves
-
Easy access from prep line
Deli
Best layout:
-
Zone-based shelving
-
Meat and cheese sections
-
Prepared food area
-
Condiments and sandwich prep items near entrance
-
Clear labeling for rotation
Bakery
Best layout:
-
Rack-friendly layout
-
Dairy and fillings grouped together
-
Dough trays organized separately
-
Finished products protected from raw ingredients
-
Door near prep area
Seafood Business
Best layout:
-
Dedicated seafood zone
-
Lower storage for raw seafood
-
Easy cleaning access
-
Ice and seafood prep storage
-
Strong separation from ready-to-eat items
Market or Grocery Store
Best layout:
-
U-shaped or center aisle shelving
-
Department-based zones
-
Bulk storage in the back
-
Fast-moving items near entrance
-
Wider movement paths where possible
How Atlantic Can Help With Walk-In Cooler Layout Planning
Choosing a walk-in cooler is not only about selecting a box size. Door placement, floor options, shelving layout, refrigeration setup, indoor or outdoor location, and delivery access all affect how well the cooler works for your business.
Atlantic Restaurant & Supermarket Equipment helps restaurants, supermarkets, delis, bakeries, seafood businesses, markets, cafés, and foodservice operators compare walk-in cooler options based on their space, storage needs, and daily workflow.
Whether you need a compact walk-in cooler for a small restaurant, a larger cooler for a market, a walk-in freezer, or a cooler/freezer combo box, our team can help you think through the layout before you buy.
If you are not sure which walk-in cooler size or layout is right for your operation, contact Atlantic Restaurant & Supermarket Equipment. Our team can help you choose a practical cold storage solution that fits your business, your space, and your long-term needs.